Hello World Tutorial
Overview
Section titled “Overview”The HelloWorld example shows how to develop a simple Swift class in Xcode, compile it to a native Android library, and very easily call the code in Android Studio.
| Functionality demonstrated | Technology demonstrated | Github Project |
|---|---|---|
| • Call methods of a Swift class • Support of closures | • Swift Android compiler • Swift4j | • n.a |
The HelloWorld tutorial is extremely detailed. Please ensure you understand each step. In other tutorials, we will omit some instructions to avoid instruction bloat.
Develop in Xcode
Section titled “Develop in Xcode”Create Xcode project directory
Section titled “Create Xcode project directory”-
Create a directory HelloWorld that contains your Swift library. Let’s refer to this as the project directory.
Terminal window ./Projects % mkdir HelloWorld
Create Xcode project
Section titled “Create Xcode project”-
Create an Xcode project that contains your shared code:
swift package init --type library --name HelloWorldMake sure to use it from inside your project directory:
Terminal window ./Projects/HelloWorld % swift package init --type library --name HelloWorldAs a result, you see:
Terminal window Creating library package: HelloWorldCreating Package.swiftCreating .gitignoreCreating Sources/Creating Sources/HelloWorld/HelloWorld.swiftCreating Tests/Creating Tests/HelloWorldTests/Creating Tests/HelloWorldTests/HelloWorldTests.swift
Open project in Xcode and add first Swift class
Section titled “Open project in Xcode and add first Swift class”-
Open the project in Xcode.
-
Create a Swift class called GreetingService:
public class GreetingService {// applies the function fct to the String parameter name and returns the resultfunc greet(name: String, _ fct: (String) -> String) -> String {return fct(name)}}- This is a very simple class with a function
greet. - Function
greethas two arguments:- name: a variable of type
String - fct: a variable of type closure
- name: a variable of type
- The function executes the closure using the
nameargument as an input and returns aString.
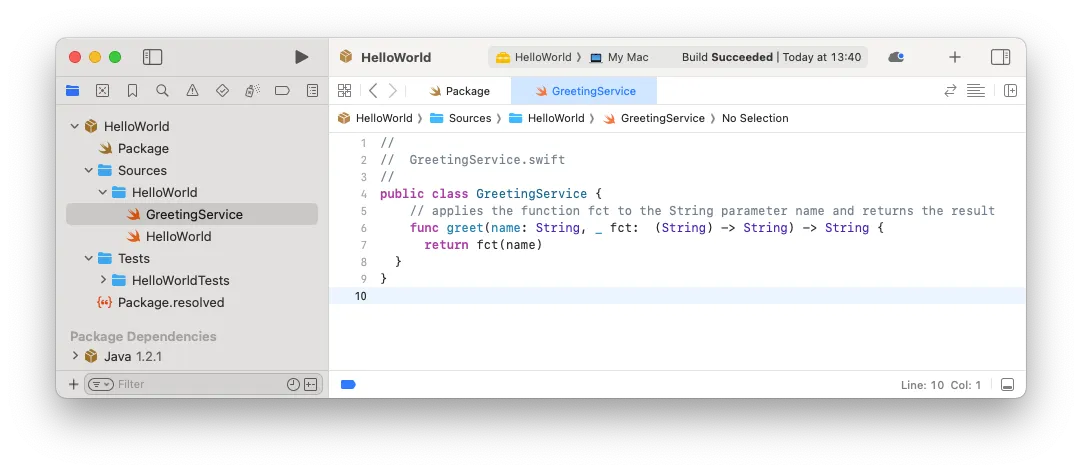
- This is a very simple class with a function
Add @jvm to compile the class to Android
Section titled “Add @jvm to compile the class to Android”Now we make the changes to be able to compile the class to Android.
-
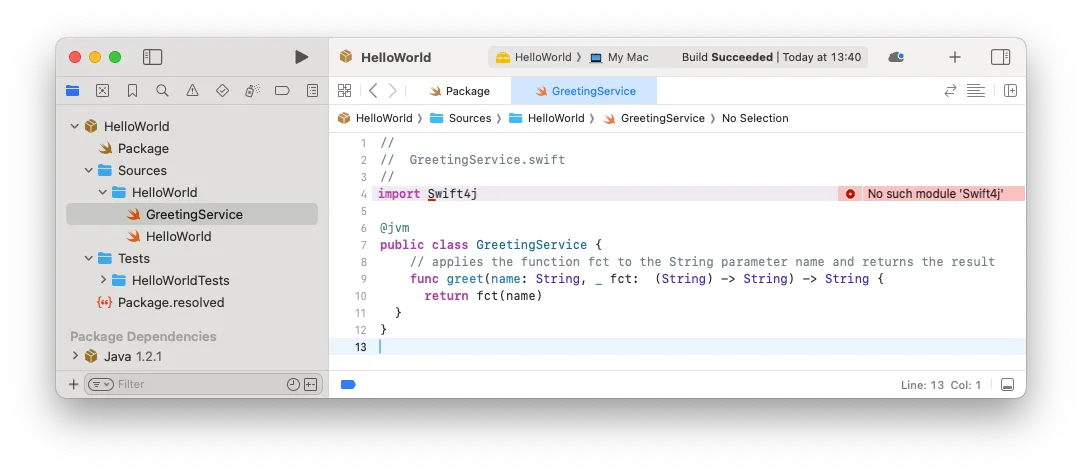
Add @jvm to the classes you want to compile to Android. In our case here, we add @jvm to the
GreetingServiceclass. -
Import Swift4j using import Swift4j (pay attention to the lowercase j). The @jvm annotation is part of the Swift4j library.
import Swift4j@jvmpublic class GreetingService {// applies the function fct to the String parameter name and returns the resultfunc greet(name: String, _ fct: (String) -> String) -> String {return fct(name)}} -
As you can see, Xcode is complaining about the missing module Swift4j (“No such module Swift4j”).
Add Swift4j dependency in package.swift
Section titled “Add Swift4j dependency in package.swift”To fix the compile errors and compile the Swift project, you now need to add the necessary dependencies and modify the Package.swift as described here.
The steps describe the necessary changes. Either carefully make the changes yourself for learning and training purposes to the existing Package.swift or alternatively copy and replace the Package.swift from the code snippet at the bottom.
-
Change 1: Add a platform with minimum version (not included by default):
platforms: [.macOS(.v13)],This ensures a minimum version and avoids compiler errors.
-
Change 2: You need to set the library target type to dynamic:
type: .dynamic,This is due to limitations of JNI. Only Swift targets that are part of dynamic libraries can be accessed from Java/Kotlin.
-
Change 3: Add a dependency on the Swift4j package into the
Package.swiftfile:dependencies: [.package(url: "https://github.com/scade-platform/swift4j.git", from: "1.3.0")] -
Change 4: Add the Swift4j package as a dependency to our target:
.target(...dependencies: [.product(name: "Swift4j", package: "swift4j")])
The entire updated Package.swift file should now look like below:
// The swift-tools-version declares the minimum version of Swift required to build this package.
import Foundationimport PackageDescription
let package = Package(    name: "HelloWorld",
    platforms: [        .macOS(.v13)       ],
    products: [        .library(            name: "HelloWorld",            type: .dynamic,            targets: ["HelloWorld"])    ],
    dependencies: [        .package(url: "https://github.com/scade-platform/swift4j.git", from: "1.3.0")    ],
    targets: [        .target(            name: "HelloWorld",            dependencies: [              .product(name: "Swift4j", package: "swift4j")            ]        )    ])
Build should now be successful
Section titled “Build should now be successful”Your build should now be successful. In some cases, you also need to give permission to access the Swift4j library. You can do this in Xcode by clicking on the error message and approving the library.
Reuse Swift code on Android
Section titled “Reuse Swift code on Android”Create new Android project
Section titled “Create new Android project”-
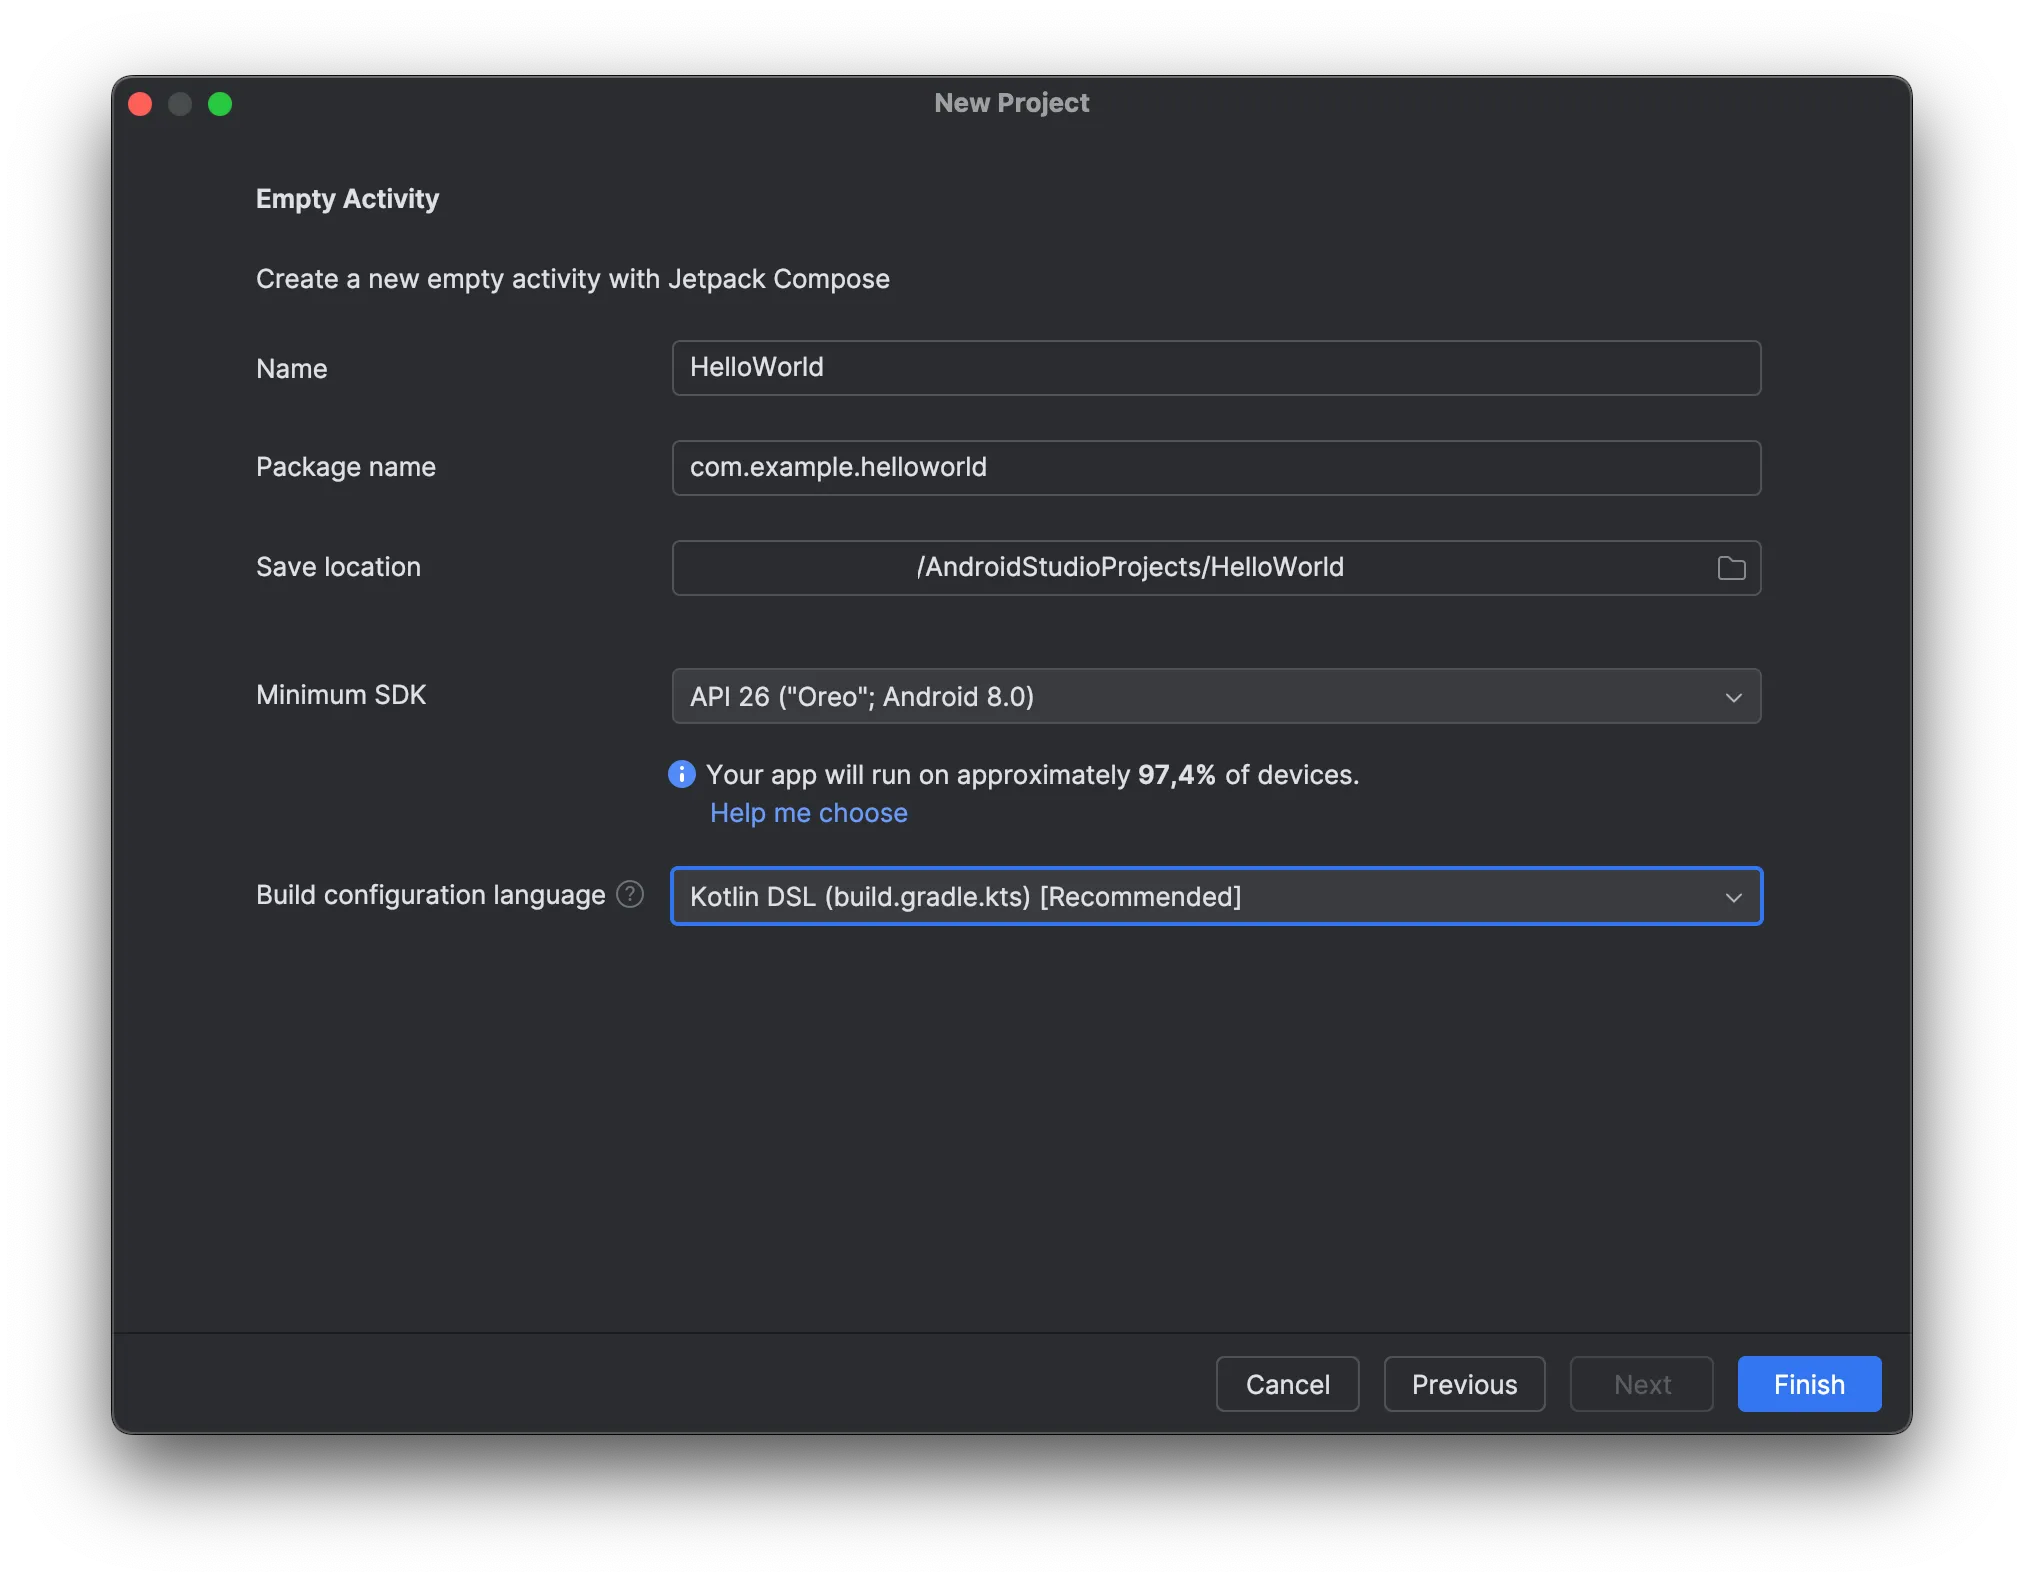
Choose File > New Project
-
Choose Empty Activity
-
Call the project HelloWorld
- Choose Kotlin DSL as build configuration language
Setup the gradle config file in the app directory
Section titled “Setup the gradle config file in the app directory”- Open the build.gradle.kts file in the app directory
- There is a 2nd
build.gradle.ktsoutside of the app directory. Don’t use that one.
-
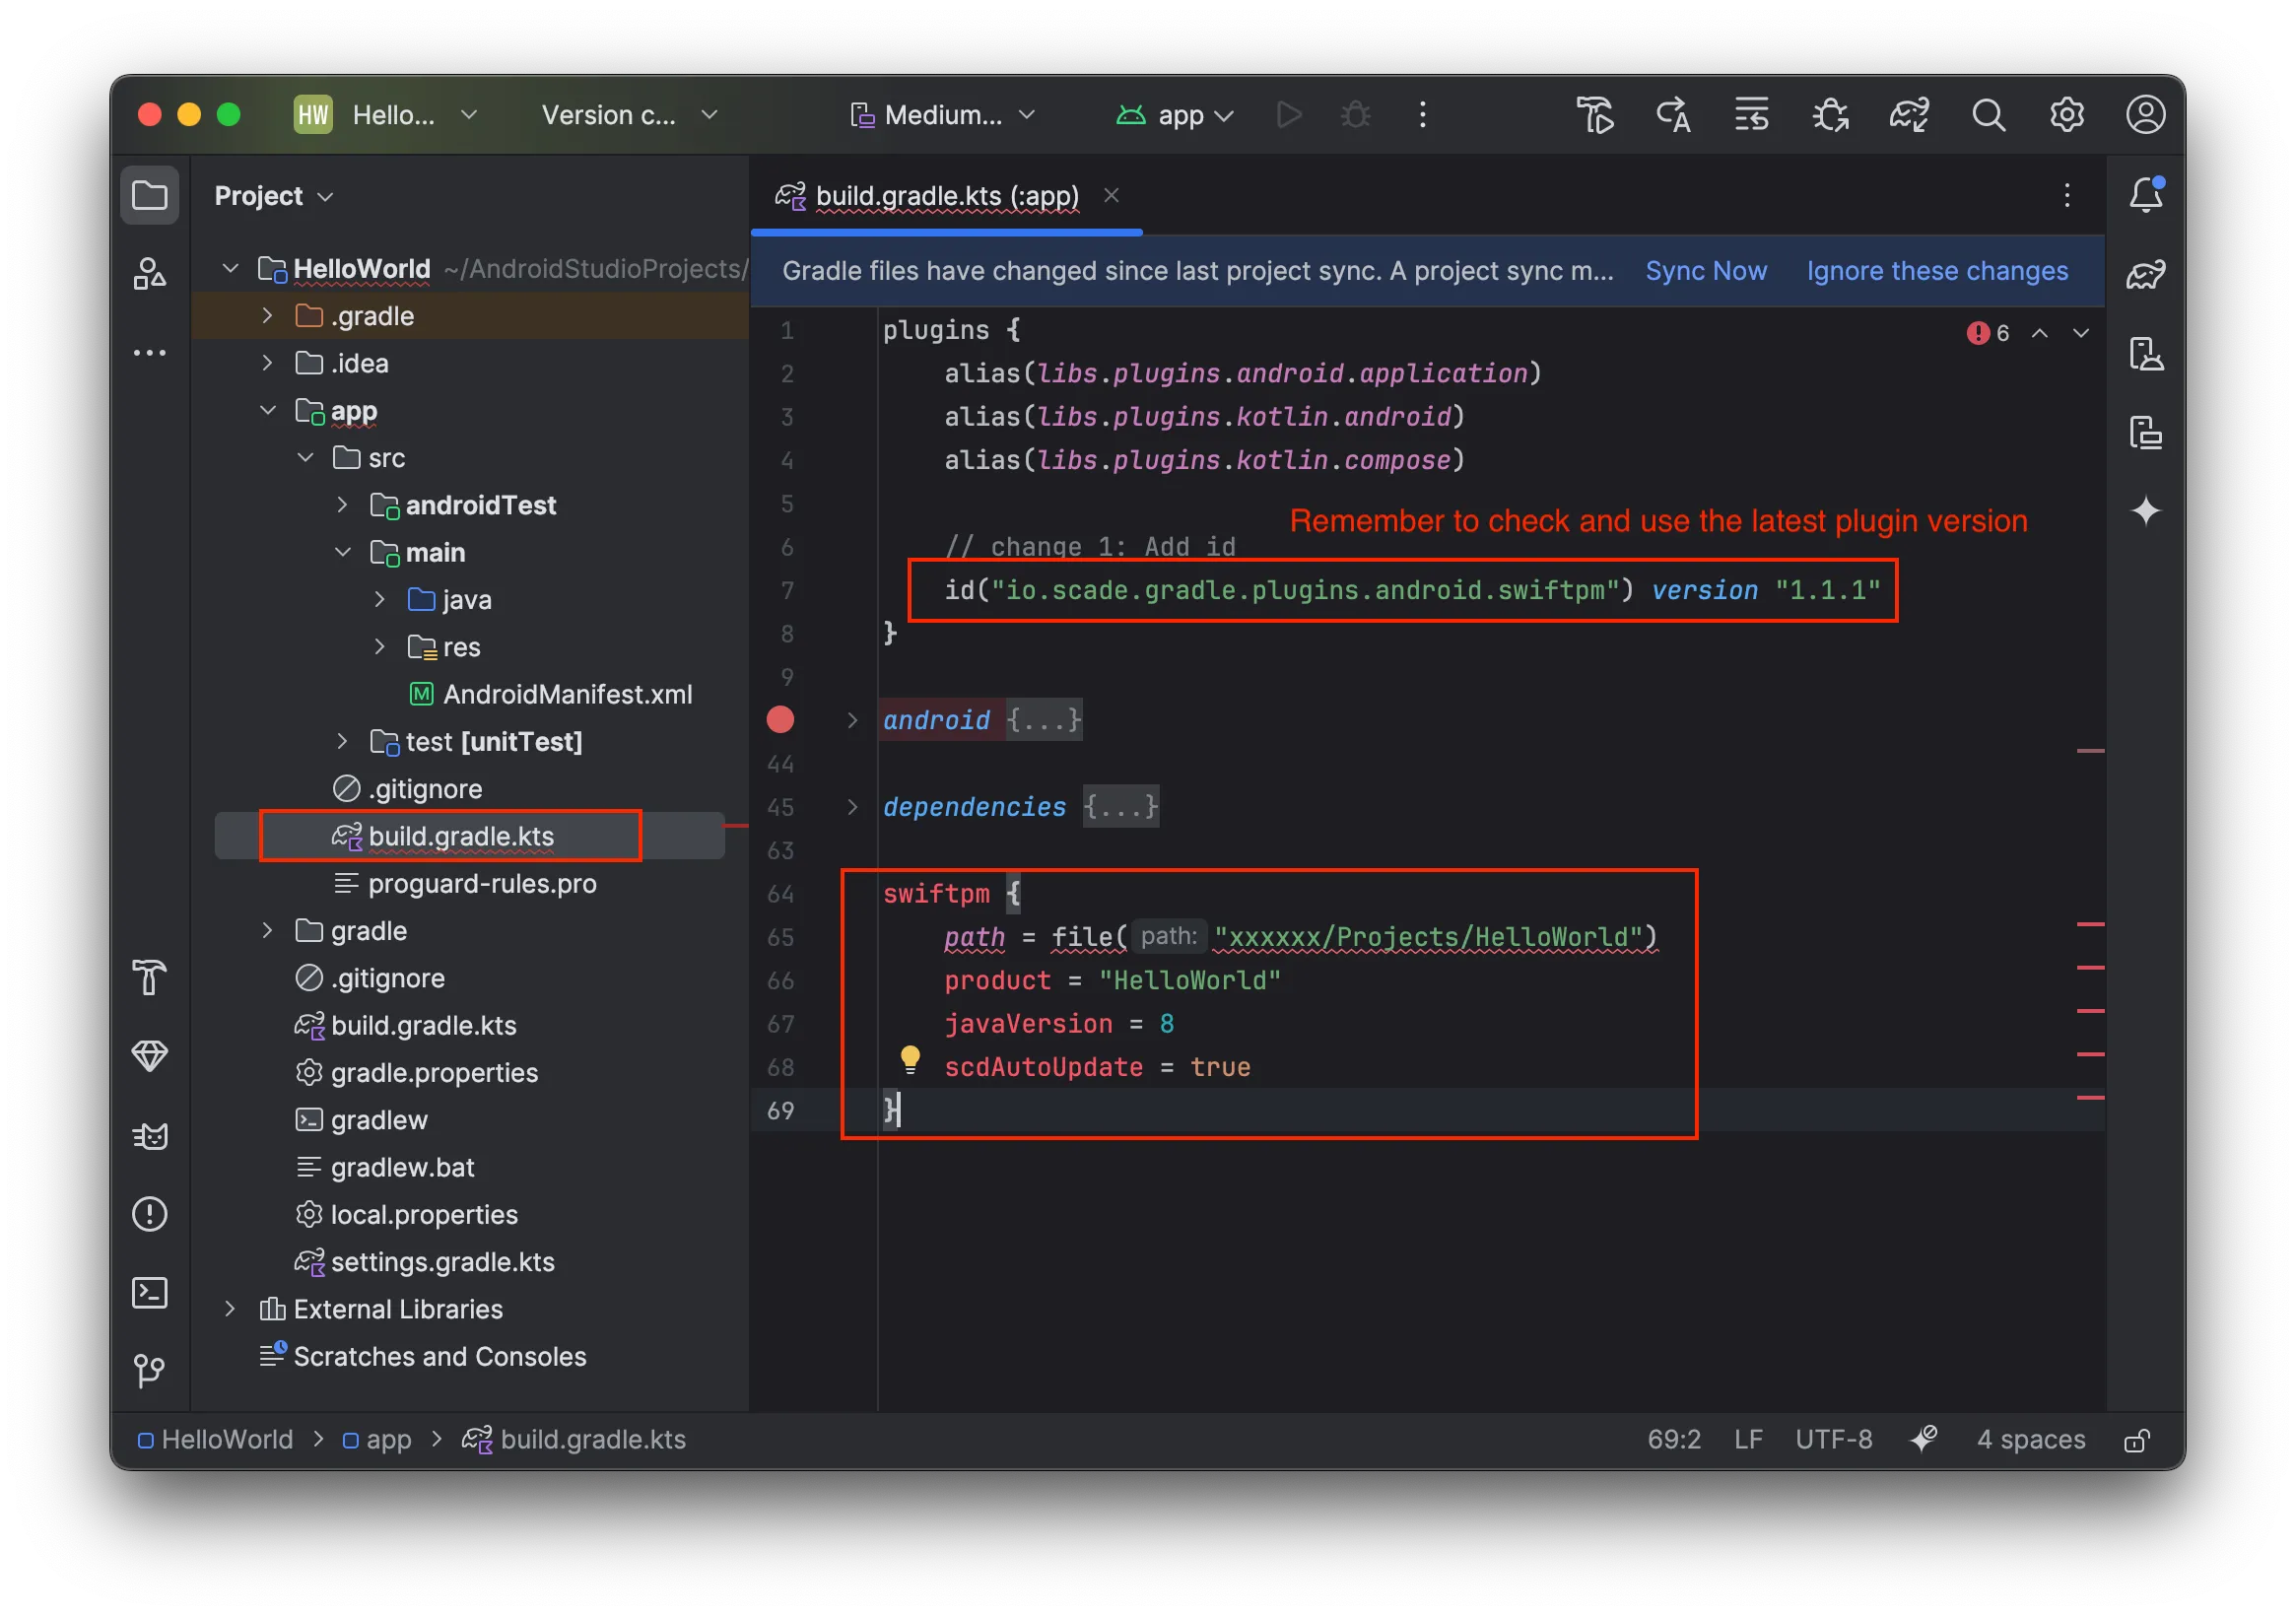
Add the SCADE Swift Product Manager plugin under plugins:
id("io.scade.gradle.plugins.android.swiftpm") version "1.3.0" -
Add the SCADE Swift Product Manager configuration at the bottom of the file:
swiftpm {path = file("<fullpath>/Projects/HelloWorld")product = "HelloWorld"javaVersion = 8scdAutoUpdate = true}- The path needs to point to the directory of the Swift project (see step 1).
- Set the product to “HelloWorld”.
Build and run the project to see it’s working
Section titled “Build and run the project to see it’s working”-
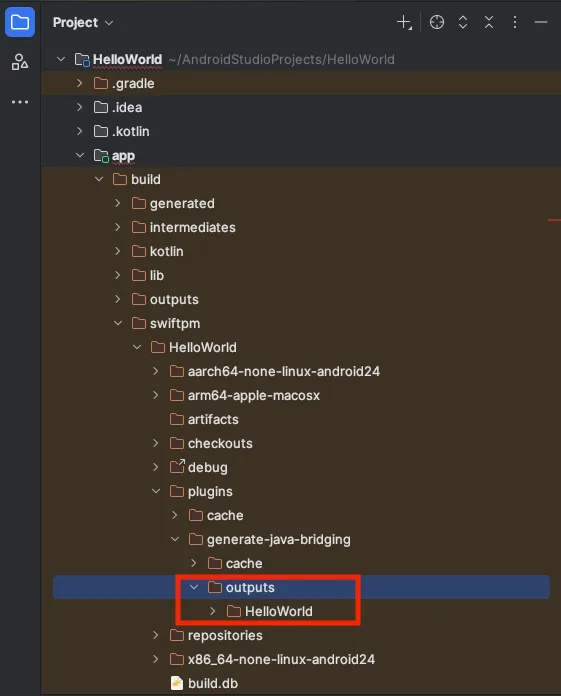
Build the project. When you run the build for the first time, it downloads all dependencies and compiles the source code. This could take 2–3 minutes. Subsequent builds will be much faster.
Once the build has succeeded, you can find the Java interop code here:
-
To test the setup., run the Android app in the simulator. You have to assign a simulator in Android Studio and configure a run file. This step is not described in detail here, as these are basic Android development steps.
Bind Swift logic to Android UI control
Section titled “Bind Swift logic to Android UI control”By now, we compiled Swift code to Android. We included the resulting library called HelloWorld in the Android project and had SCADE generate the interop code. We now can bind the logic to the UI.
-
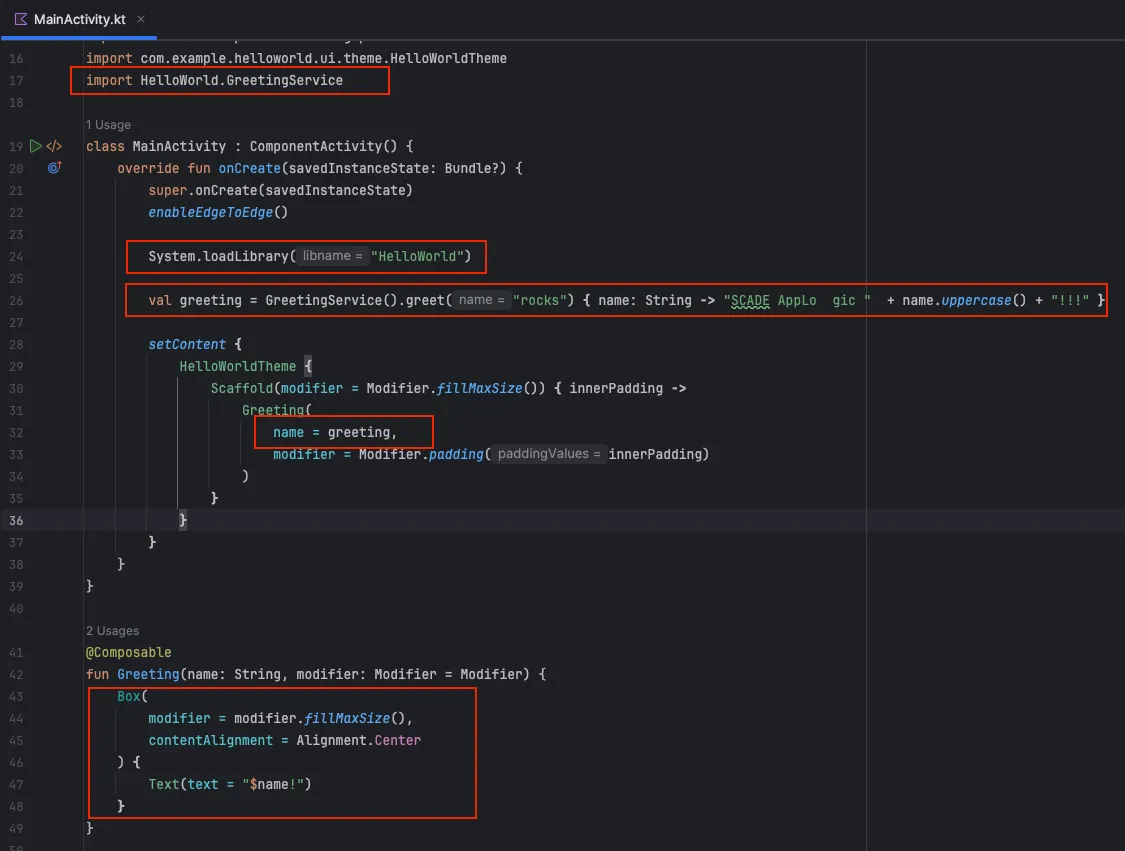
Import the code using the import command. Add:
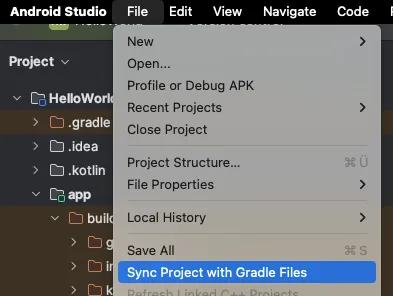
import HelloWorld.GreetingServiceIf Android Studio cannot find the namespace or class and autocompletion does not work, use the Sync Project with Gradle File menu from Android Studio.
-
Add the line System.loadLibrary(“HelloWorld”) in the
onCreatemethod to load the HelloWorld library.class MainActivity : ComponentActivity() {override fun onCreate(savedInstanceState: Bundle?) {super.onCreate(savedInstanceState)enableEdgeToEdge()System.loadLibrary("HelloWorld")This loads your Swift code into memory and the code is ready to use.
-
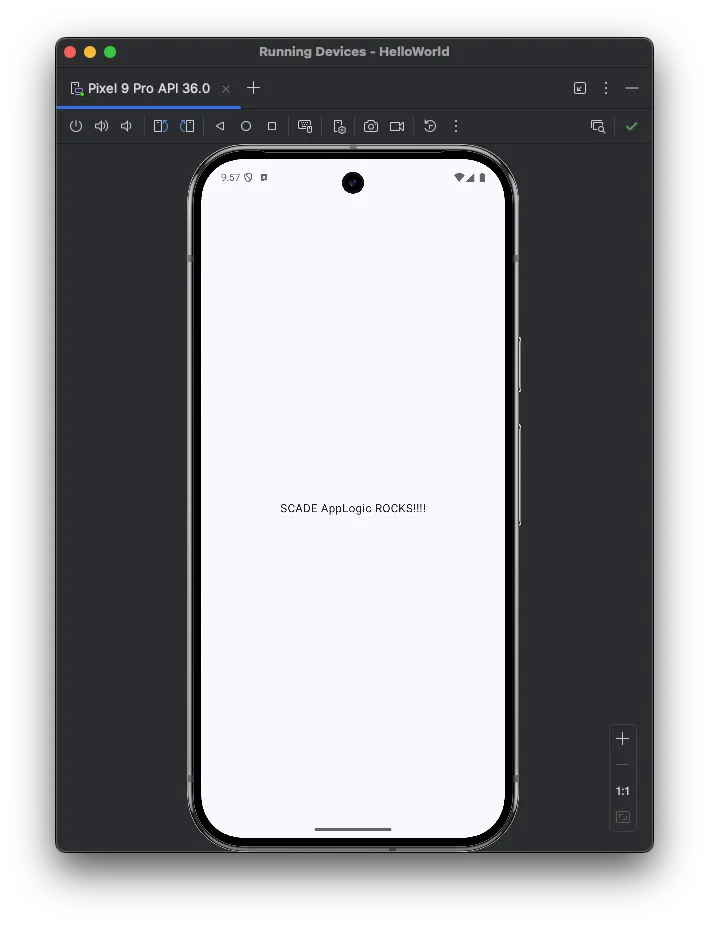
Finally, call the Swift code. SCADE produces extremely powerful interop code. Calling our greet method developed in Swift code is extremely easy. Add the following code in the next line:
val greeting = GreetingService().greet("rocks"){ name: String -> "SCADE AppLogic " + name.uppercase() + "!!!" }- First, we instantiate the
GreetingService. - Then we call the greet method with parameter
nameset to"rocks"and pass in the closure:- The closure takes a
Stringas input, converts it to uppercase, and concatenates it with twoStringconstants. - The closure then returns the result.
- The closure takes a
- We store the result in a variable
greeting.
Great! So we coded our first call to a Swift method in Android.
- First, we instantiate the
-
Bind the
greetingvariable into the UI text label. In the setContent code, setname = greeting.setContent {HelloWorldTheme {Scaffold(modifier = Modifier.fillMaxSize()) { innerPadding ->Greeting(name = greeting,modifier = Modifier.padding(innerPadding))}}}As a final (optional) step, we make the UI more beautiful by centering the label. Replace the Greeting function with the following code:
@Composablefun Greeting(name: String, modifier: Modifier = Modifier) {Box(modifier = modifier.fillMaxSize(),contentAlignment = Alignment.Center) {Text(text = "$name!")}}This centers the text control by introducing a
Boxcontrol.We are done coding !
Here’s the full code for MainActivity.kt:
package com.example.helloworld
import androidx.compose.foundation.layout.Boximport androidx.compose.foundation.layout.fillMaxSizeimport androidx.compose.ui.Alignmentimport android.os.Bundleimport androidx.activity.ComponentActivityimport androidx.activity.compose.setContentimport androidx.activity.enableEdgeToEdgeimport androidx.compose.foundation.layout.paddingimport androidx.compose.material3.Scaffoldimport androidx.compose.material3.Textimport androidx.compose.runtime.Composableimport androidx.compose.ui.Modifierimport androidx.compose.ui.tooling.preview.Previewimport com.example.helloworld.ui.theme.HelloWorldThemeimport HelloWorld.GreetingService
class MainActivity : ComponentActivity() {    override fun onCreate(savedInstanceState: Bundle?) {        super.onCreate(savedInstanceState)        enableEdgeToEdge()
        System.loadLibrary("HelloWorld")
// Call Swift Code easily val greeting = GreetingService().greet("rocks") { name: String -> "SCADE AppLogic " + name.uppercase() + "!!!" }
setContent { HelloWorldTheme { Scaffold(modifier = Modifier.fillMaxSize()) { innerPadding -> Greeting( name = greeting, modifier = Modifier.padding(innerPadding) ) } } } }}
@Composablefun Greeting(name: String, modifier: Modifier = Modifier) { Box( modifier = modifier.fillMaxSize(), contentAlignment = Alignment.Center ) { Text(text = "$name!") }}
@Preview(showBackground = true)@Composablefun GreetingPreview() { HelloWorldTheme { Greeting("Android") }}Run the native Swift app on Android
Section titled “Run the native Swift app on Android”Run your first cross-platform native Swift app. Press the run button and see the application running: